Serve your first model with Scikit-Learn + Flask + Docker
Learn about implementing a microservice for serving a prediction machine learning model built in Scikit-Learn
In previous blog posts, we have been talking about the importance of closing the deployment gap in projects of AI and machine learning 👇
You can also follow the article plus the tutorial in the following video (However, it is only available in Spanish) 👇
One of the first steps in achieving this is to create a process to serve machine learning models to the organization. This is usually done by creating an application to run the prediction model and return the prediction, in the example in this post we are going to use a handy stack to create and serve models. We will be using Python as the base programming language, the Scikit-Learn package for building the model pipeline: preprocessing the data, training the model and saving the model into a file, the Flask package to develop a web application for the interaction between the client and the prediction model and finally Docker for containerizing the application to prepare it for deployment.
Before starting, you can find all the code presented here in the following Github repository: (Feel free to do with it what you want)
Example Data
In this example we are going to work with the dataset: Breast Cancer Wisconsin (Diagnostic) [1], a widely used dataset for testing machine learning models. In this dataset features are computed from a digitized image of a fine needle aspirate (FNA) of a breast mass and it was first introduced in K. P. Bennett and O. L. Mangasarian: “Robust Linear Programming Discrimination of Two Linearly Inseparable Sets”, Optimization Methods and Software 1, 1992, 23–34]. It can be found and downloaded from the UCI Machine Learning Repository:
https://archive.ics.uci.edu/ml/datasets/Breast+Cancer+Wisconsin+%28Diagnostic%29
| id | diagnosis | radius_mean | texture_mean | perimeter_mean |...|
--------------------------------------------------------------------
| 1  |     M     |    17.99    |     10.38    |      122.80    |...|
| 2  |     M     |    20.57    |     17.77    |      132.90    |...|
| 3  |     M     |    19.69    |     21.25    |      130.00    |...|
| 4  |     M     |    11.42    |     20.38    |       77.58    |...|
| 5  |     M     |    20.29    |     14.34    |      135.10    |...|
The dataset consists of 569 instances with 32 different attributes, and the target is the diagnosis (M = malignant, B = benign).
Architecture
Now let’s talk architecture, for this example, we are focusing on building a microservice. But what are microservices you ask? They are maintainable, testable, independent, and loosely coupled services with often one real use case or function. Microservices can be used as an approach to developing a single application as a suite of small services, each running in its own process and communicating with lightweight mechanisms, often an HTTP resource API [2].

Traditionally, software applications have been delivered in silos following a monolithic architecture. But in recent years microservices have become a best-practice architectural principle that shapes the delivery of solutions to the business in the form of services. By deploying AI and machine learning/deep learning models as microservices, businesses can seamlessly add and remove services from an application without disrupting its other services.
For this example, the idea is to build a machine learning microservice from the bottom up by using different layers or tiers, first of the following:
Level 1
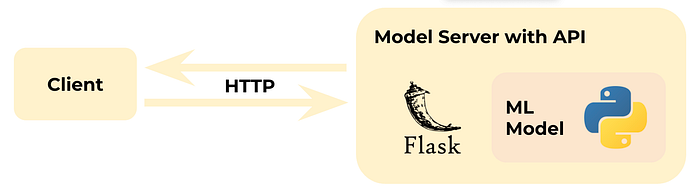
At level 1, we need to train and save a machine learning model and wrap it in a Flask web application, creating the endpoints for subsequent interaction with the client via the HTTP protocol.
Level 2
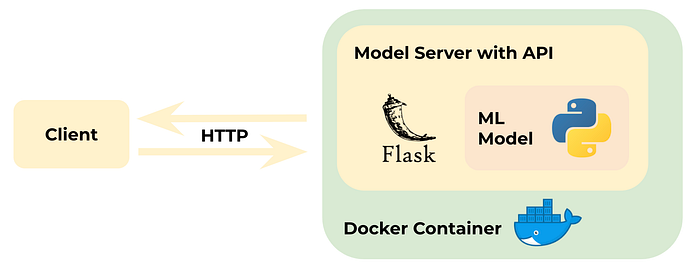
At level 2, we will create a Docker image containing everything needed to run the application: the application code, libraries, tools, dependencies, and other files. We will later use this image to run the application in containers.
Level 3
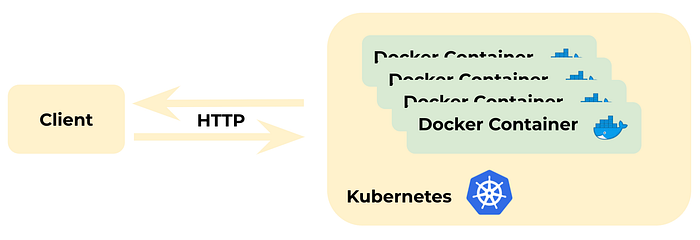
At the last level (not covered in this post), we can finally take our containerized application and host it in a completely secure enterprise environment running on Kubernetes for scalability.
Setting up the Environment
After downloading the dataset, we now need to set up our working environment, for this, it is useful to start by creating a virtual environment for the project. This is an important step because, by default, every Python project on your system will use the same directories to store and retrieve site-packages. By creating a virtual environment we help to create an isolated environment for Python projects, to keep track of every package. This way each project can have its own dependencies, regardless of what dependencies every other project has.
Install the package needed for creating a virtual environment*:
$ pip install virtualenv*If you are using Python 3, then you should already have the virtualenv module from the standard library installed.
Next up, create a new virtual environment with the name venv:
$ virtualenv venvIt’s also helpful to specify the Python version used to create the environment by using the option -p and the Python path (This is helpful later when building the Docker image to match the same Python version).
$ virtualenv -p path_to_python venvFinally, we can activate the virtual environment:
$ source venv/bin/activate*Commands are a bit different if you are working with Windows, however, this is a really great guide to get going with virtual environments in Windows: https://medium.com/co-learning-lounge/create-virtual-environment-python-windows-2021-d947c3a3ca78
Python packages
Once we have the virtual environment activated we need to install the software dependencies (site-packages), a list of the Python packages and their versions are listed in the file requirements.txt:
We can install the dependencies by running the command:
$ pip install -r requirements.txtAfter the installation is done, we can check we have correctly installed all the packages in our virtual environment:
$ pip freezeWe should see the same list in the file requirements.txt, this means that now we are ready to train our model.
Training Pipeline
First up, let’s look at the project structure:
(root) sklearn_flask_docker/
├── code/
│   └── train.py
├── data/
│   └── breast_cancer.csv
├── model/
│   └── model_binary.dat.gz
├── ms/
│   ├── __init__.py
│   └── functions.py
├── tests/
│   └── example_calls.txt
├── .gitignore
├── Dockerfile
├── LICENSE
├── README.md
├── app.py
└── requirements.txt
In the folder code/, we will find the main script for training our model train.py, here we basically follow the standard data science process for training a model: loading the data, preprocessing, training and finally saving the model.
We use the Pipeline class in the Scikit-Learn package to produce an actual pipeline with the steps needed to preprocess the data and run the model, using a SimpleImputer to treat missing values, a MinMaxScaler for scaling the data and finally, an ensemble model made up of a Logistic Regression, a Decision Tree and a Support Vector Machine combined by a Voting Classifier to illustrate the power of the pipeline, at the end of the script we save the pipeline as a file, this means that on our microservice, new data coming to the pipeline will go through the imputer the scaler and finally the model to create and return a response.
Web application
Now we need to create our Flask application, for this, we start by creating the web application using Flask (app.py):
Here we create the routes for the endpoints of our application, an /info route with the GET method to retrieve the information from the model and a /predict route with the POST method to receive input data, run the data through the pipeline and produce a prediction for the client. The file ms/functions.py contains the auxiliary functions in helping run the model:
We can now go ahead and test our application by running:
$ flask run -p 8000This command will run the development server locally and listen to port 8000 where we can test our application! The folder /tests contain some example calls to test that our application is up and running:
$ curl -X GET http://localhost:8000/infoThe service should respond:
{“name”:”Breast Cancer Wisconsin (Diagnostic)”,”version”:”v1.0.0"}Container
Finally, we can create our container, following the Dockerfile we give the instructions to create an image with everything we need to run the application we just created. Docker allows us to create containers that have everything the app needs to run including libraries, system tools, code, and runtime. These containers are used to construct a run-time environment and run an application.
An image is essentially built from the instructions for a complete and executable version of an application, which relies on the host OS kernel. We start from the official base image of python:3.9, copy our application files (including the app, the model, and the requirements), install the requirements, and run the application by using gunicorn exposed through the port 8000.
We are ready to build the image by running:
$ docker build . -t sklearn_flask_docker
The process should take a couple of minutes, but in the end, we are going to have a Docker image with the name sklearn_flask_docker which will serve as the base for our application.
Serving and Testing
We are now ready to serve our containerized application as a service! We can test it locally by running:
$ docker run -p 8000:8000 sklearn_flask_docker
This will launch the application at localhost where we will be able to test it on the port 8000, we can use another example call to test it with a single observation:
curl -d ‘[{
  “radius_mean”: 17.99,
  “texture_mean”: 10.38,
  “perimeter_mean”: 122.8,
  “area_mean”: 1001.0,
  “smoothness_mean”: 0.1184,
  “compactness_mean”: 0.2776,
  “concavity_mean”: 0.3001,
  “concave points_mean”: 0.1471,
  “symmetry_mean”: 0.2419,
  “fractal_dimension_mean”: 0.07871,
  “radius_se”: 1.095,
  “texture_se”: 0.9053,
  “perimeter_se”: 8.589,
  “area_se”: 153.4,
  “smoothness_se”: 0.006399,
  “compactness_se”: 0.04904,
  “concavity_se”: 0.05373,
  “concave points_se”: 0.01587,
  “symmetry_se”: 0.03003,
  “fractal_dimension_se”: 0.006193,
  “radius_worst”: 25.38,
  “texture_worst”: 17.33,
  “perimeter_worst”: 184.6,
  “area_worst”: 2019.0,
  “smoothness_worst”: 0.1622,
  “compactness_worst”: 0.6656,
  “concavity_worst”: 0.7119,
  “concave points_worst”: 0.2654,
  “symmetry_worst”: 0.4601,
  “fractal_dimension_worst”: 0.1189
}]’ \-H “Content-Type: application/json” \-X POST http://0.0.0.0:8000/predict
The application should respond:
{“label”:”M”,”prediction”:1,”status”:200}And we are done! Our application is ready to be served as a prediction service! Lastly, stay tuned for a second part where we will use the built application and host it in a completely secure enterprise environment running on Kubernetes for scalability.
References
[1] Dua, D. and Graff, C. (2019). UCI Machine Learning Repository [http://archive.ics.uci.edu/ml]. Irvine, CA: University of California, School of Information and Computer Science.
[2] Lewis, J., & Fowler, M. (2014, March 25). Microservices. Martinfowler.Com. https://martinfowler.com/articles/microservices.html